
Taping For Achilles Tendonitis that works!
I rarely use K-taping when taping for Achilles Tendonitis, there’s simply better options. Let me walk you through what they are and how they work.
This article will take you all through two separate taping techniques that you can try to reduce the pressure on your Achilles tendon and decrease your symptoms, including any lumps on the Achilles tendon.
Achilles pain from tendonitis can be debilitating and does not usually go away by itself. Its helpful to have some tricks asides from exercise that can help with short term pain relief for your tendon.
Want instant pain relief techniques?
Click below to try our Achilles Masterclass
The taping techniques described below can help in the short term like other techniques such as massage, but keep in mind the only way to help Achilles pain is correct load management. If you want to get on top of your Achilles pain quickly then check out our FREE Achilles tendinopathy guide.
Or consider trialling our Online Achilles Tendinopathy Course!
Before we jump into the specifics of taping techniques for Achilles Tendonitis lets have a quick recap on what Achilles Tendonitis actually is.
Prefer to skip ahead?
- What is Achilles Tendonitis?
- Low-dye taping
- Dorsiflexion-blocking taping
- How long should you leave tape on for?
- What type of tape should you buy?
- Why Rigid over K-Tape for Achilles Tendonitis?
What is Achilles Tendonitis?
Achilles Tendonitis is a term used to describe a process where the Achilles tendon begins to degenerate. The most notable problem is pain in the tendon, but there can also be swelling and clicking.
Tendons attach muscles to bone and the Achilles tendon is the largest of these in our body. It attaches your calf muscle to your heel. Due to its size it has to accommodate large forces.
The cause of Achilles Tendonitis is usually a sudden increase in those forces to the tendon. This could vary for different people, but it might be because you hiked for a day when you hadn’t been in a while, or if you increased your running too quickly.
There are two types of Achilles Tendonitis – mid-substance and insertional. Insertional Achilles Tendonitis can also have associated pathologies like a Haglund’s Deformity, or bursitis.
The mainstay treatment for Achilles Tendonitis are exercises that will increase the load through the tendon. However, there are other treatment options that can provide temporary relief such as taping or heel lifts.
If the condition is managed well you should be able to recover from Achilles Tendonitis. Usual recovery time will vary as it really depends how long you have had the condition. You should see some results within 3 months of loading the tendon well.
Which technique should I use when taping for Achilles Tendonitis?
There are many taping techniques for Achilles Tendonitis and it can be difficult for most people to know where to start. Below we have described two techniques that have the best results in our clinical experience specifically when dealing with Achilles Tendinopathy.
The first one called a low-dye tape works well if your foot caves in when you walk, as it is designed to help support the arch of your foot and mimic orthotics. This can also be helpful to use during running for Achilles Tendonitis. The other condition this taping can be used to help is Plantar Fasciitis.
The second tape for Achilles tendonitis is there to help prevent the foot from bending up too much, we call this dorsiflexion. This movement of the foot is often what will aggravate insertional Achilles tendinopathy. (Make sure you’re heel pain is not resulting from other causes of heel pain before diagnosing insertional Achilles Tendonitis)
We would recommend that you try both techniques to see if either helps with your pain. You will know in a day or two if the taping is helping, if not, then feel free to remove it.
Prefer video? Have a look below at both taping techniques described in detail:
Considerations before Taping for Achilles Tendonitis
Achilles taping should not be applied if there is a chance you could be allergic to the tape. We have covered how to test this in one of the sections below.
It’s also important that you have full sensation around your foot. If you do not have sensation, you may not recognise if your skin reacts to the tape. This can result in unnecessary complications like skin coming off when the tape is removed.
Keep in mind these taping techniques are not long-term fixes. They are there to provide some pain-relief as you continue with your exercise program. The thing that will improve this problem is load through the tendon which gradually increases as the tendon adapts.
If you need instant relief, another technique worth looking into is heel lifts or bracing to change the load through your Achilles tendon. Another idea is looking into the best shoes for Achilles Tendonitis – as these will have an impact on recovery!
Low-Dye Taping For Achilles Tendonitis:
Measure a piece of tape that will fit all the way around your foot in this manner. When you have the right length, cut or rip the tape and use this piece first.
Start on the top of your foot near the knuckle of the big toe. As you wrap the tape around the inside of your foot, gently increase the arch of the foot with your free hand. You don’t want to overdo this part, just a subtle increase in arch – otherwise it will be painful to walk on.
Continue to wrap that first piece behind the heel and all the way up the outside of the foot, finishing near the knuckle of your little toe.
Once the first piece is done, measure three little pieces that will span the bottom of the foot.
Start the first little piece near the 5th knuckle, on your first strip of tape. You are going to pull the tape under your foot and gently pull up as you connect the tape on the other side.
Repeat this process with the next tape but start further down the foot. I usually overlap the tape by about half. You repeat this process again with the third piece of tape.
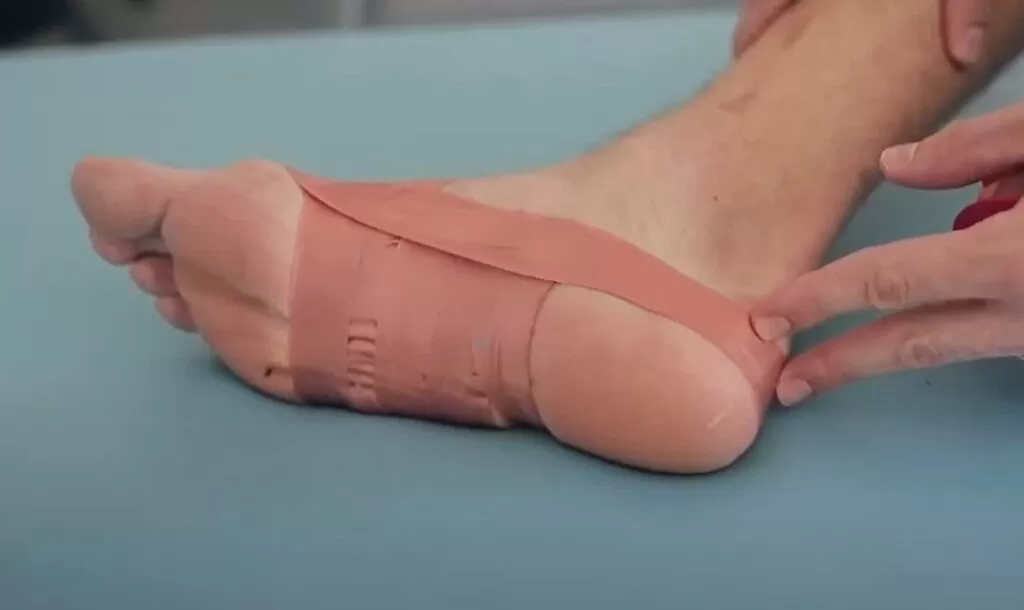
Sometimes if you may need a fourth piece, depending on how much you have overlapped and the size of your foot. You finish the under pieces when you begin to reach the heel of the foot.
Now repeat the first tape going the whole way around the foot from inside to out.
Important to test!
Finally, test the tape out. Step on your foot and see if it’s too tight. You may feel different, but if it’s pulling painfully then this may indicate the tape is too tight. Often the start of the tape near your big toe is where it will pull.
If you are happy, the final strip of tape goes along the top of your foot, securing the beginning and end of the first strips of tape.
Remember this tape will feel like its pulling a little and this is ok, as long as its not painful.
The mechanism for this tape working with Achilles tendinopathy is that we are changing the forces going up through the foot as you walk. As a result, the forces going through the Achilles can be different as well and sometimes helpful.
Dorsiflexion-blocking taping for Achilles tendonitis:
You want to start by looping the tape around your lower calf muscle, about 20cm up from the heel. Make sure this first piece isn’t tight as you will cut off circulation. Also, if you have big calves, then you can slightly angle the tape as you wrap around to help get a good line.
The next strip will go around the end of your foot, just before the balls of your feet start. Again, make sure this bit of tape is not too tight. If you are finding the toes are going red or white, you will know that the tape is much too tight!
The important part of this technique is to make sure you tape the foot in a neutral position. What I mean by this, is you want to tape the foot so you can still put your foot flat on the ground. Otherwise your walking will be affected.
Start a strip from the bottom of your foot on the outside. Run in a diagonal line over the heel and up the leg to finish on the inside of the leg. The next piece of tape will start on the inside of the foot and cross in a diagonal line finishing on the outside of the leg.
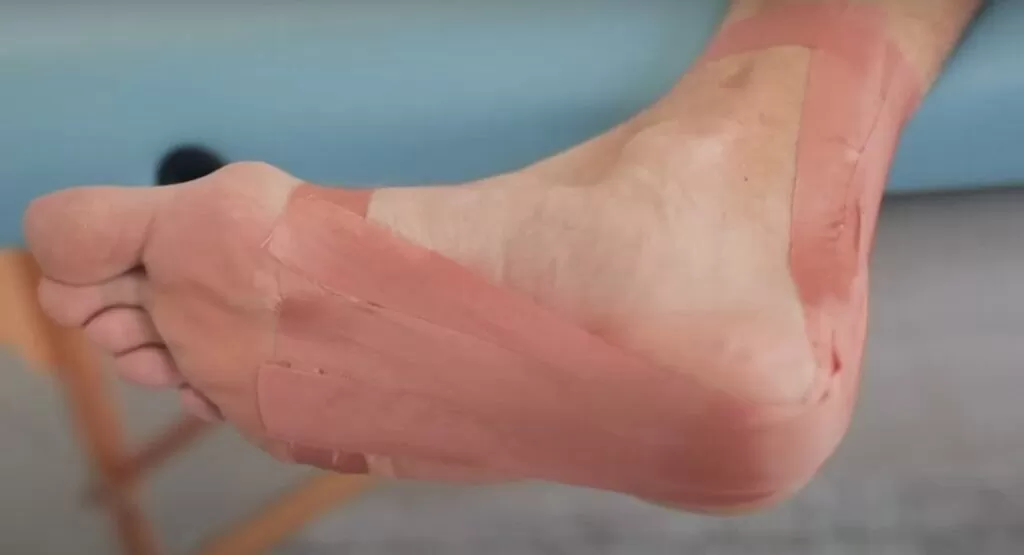
The reason for this slight crossing is to try and avoid direct pressure over the heel where the Achilles tendon inserts.
This tape will help the foot not to bend too far forwards and overstretch the Achilles tendon.
Hot tip
This taping technique usually works better for Mid-portion Achilles Tendonitis. This is because the tape will wrap around the heel and usually compress the back of the heel which can irritate an insertional Achilles Tendinopathy.
In saying this, if you have insertional Achilles Tendinopathy and still wanted to try this technique, a way around too much compression is to angle the tape so that it only goes up the very edge of the heel.
This means you will increase the angle of the tape going from foot to calf, so that it starts on the outside of the foot, wraps around the very edge of the inside heel, and then goes up the inside calf.
The same for the inside foot strip, you will angle towards the very outside of the heel, then up the outside calf.
Don’t do a strip right down the middle of the foot and up the centre of the back heel.
In this manner you avoid direct compression over the back of the heel.
How long can you keep the Achilles Tendonitis Taping on for?
This will be dependent on factors including which tape you are using, and how irritable your skin is.
In general it is always wise to test a little patch of tape on your skin first. You could place a square patch on you arm for 10-15 minutes, then remove it. If this results in red welts, you are allergic to that tape.
It’s recommended not to leave tape for any longer than a maximum of 3 days. After this time, take it off for a day to allow the skin to breath before re-applying more tape.
If you notice any itchiness or redness, remove the tape immediately. This is a sign the tape is reacting with your skin.
So, take it off after three days and let the skin breath for a day. If it was beneficial you can re-apply it after this.
What tape should you use for the Achilles Tendon?
Different tape may react differently with peoples skin. If you have had any reactions before to band aids then its recommended that you apply Hypafix tape first – which is hypoallergenic.

Hypafix is great as a base, but it stretches, and Hypafix alone won’t provide the support needed. For this reason you should apply rigid tape over the top of this, something like below should do the job.

Why rigid tape over kinesiology tape (K-tape) for Achilles Tendonitis?
K-tape has definitely become popular over the last couple of years, thrust into the spotlight via different athletes sporting the bright colours.
Unfortunately, research has shown no effects on pain or hop distance when they trialled K-tape on people with Achilles Tendinopathy.
The reason rigid tape works is it prevents the bending of the ankle, this same effect doesn’t happen with K-tape as its too flexible.
In saying this, if K-tape does work for you, then continue with it. Nothing is certain, even with research.
Conclusion
I hope one of these two techniques work for decreasing the pain you are experiencing. If not, do not lose hope as there are many other pieces of advice and exercise available in our free Achilles tendinopathy guide!
If you need results quickly another solution is our online Achilles Course where you can sign up today and receive a discounted price for a limited time only!
References:
Firth, Bridget L BSc; Dingley, Paul BSc; Davies, Elizabeth R BSc; Lewis, Jeremy S PhD; Alexander, Caroline M PhD The Effect of Kinesiotape on Function, Pain, and Motoneuronal Excitability in Healthy People and People With Achilles Tendinopathy, Clinical Journal of Sport Medicine: November 2010 – Volume 20 – Issue 6 – p 416-421 doi: 10.1097/JSM.0b013e3181f479b0
Peter Malliaras, Physiotherapy management of Achilles tendinopathy (2022),
Journal of Physiotherapy, Volume 68, Issue 4, Pages 221-237, https://doi.org/10.1016/j.jphys.2022.09.010.
Other Articles of Interest
How to calf raise with superb technique. Seated/standing variations.
Best shoes for Plantar Fasciitis in 2021
7 reasons for knee buckling: symptoms, diagnosis and treatment
Numbness in knee or leg after knee surgery? Causes, treatment and more.
Three easy keys to recovery post patella dislocation!
“As an Amazon Associate I earn from qualifying purchases.”